Self-hosting Ghost on Google Cloud
I’m sold on this stack, jump to the walkthrough!
Why this stack?
I recently helped a friend migrate his movie review blog off Wix’s free tier and onto a Ghost blog self-hosted on Google Cloud. He was looking for
- the ability to use a custom domain without an additional fee;
- a visual, rich-text content editor;
- a user-friendly website control panel accessible from mobile; and
- a plug-and-play email newsletter feature
for free, or as close to free as possible.
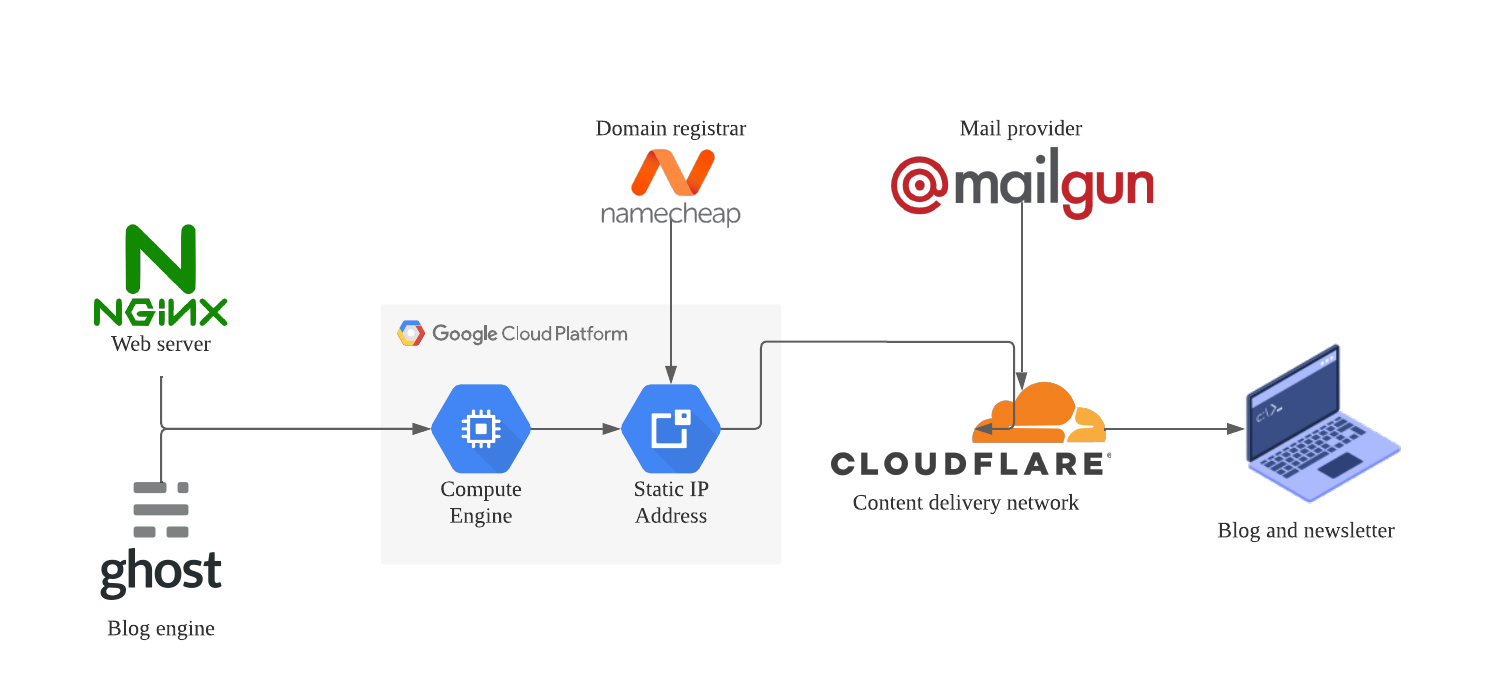
Requirement (1) ruled out other “as-a-service” website builders, while (2), (3), and (4) together ruled out my go-to Jekyll + GitHub Pages combo. In the end, I settled on the stack shown in the diagram above. A brief overview of why I chose each component:
- Blog engine. I chose Ghost as it has a beautiful content editor and a mobile-friendly control panel. While Ghost (the company) offers managed hosting plans for a fee, Ghost (the blog engine) is open-source and free to self-host.
- Web server. I chose NGINX as it is Ghost’s default option, and I went with the path of least resistance and most documentation. (In the previous version of this walkthrough, I chose Caddy as it seemed less arcane, but replicating the custom setup proved irksome after the breaking changes in Ghost v5.0.)
- Hosting server. I chose to use a Compute Engine virtual machine to host the website, because Google Cloud has a unique Always Free Tier (distinct from their free trial period) with resources enough to permanently host a small- to medium-sized blog (1GB RAM, 1GB monthly traffic to all regions except China and Australia). Google Cloud usually charges for static external IP addresses, but these are also free when attached to Free Tier virtual machines.
- Domain registrar. I like to buy my domain names through Namecheap because they’re transparent with their prices and don’t fill your cart with upsells.
- Content delivery network (CDN). I use Cloudflare’s free CDN service to shorten website loading times and protect against DDOS attacks. I also prefer managing DNS records through Cloudflare (rather than at the domain registrar level); not only is domain resolution faster, the user interface is also sleeker.
- Mail provider. Ghost has a built-in newsletter feature that integrates most easily with Mailgun. I’m not too familiar with mail providers, but Mailgun has been great so far, consistently sending emails to inbox, not spam. The first 1,250 emails every month are free, and 0.80 USD / thousand emails thereafter. (Ghost also uses Mailgun to send password reset emails, so it’s a good idea to set Mailgun up even if you won’t be sending out newsletters.)
I tried to come up with a tech stack that was as low-cost as a self-hosted website could possibly be. In the diagram above, the only cost for certain is the annual domain name rental fee; everything else is either totally free (Ghost, NGINX, MySQL) or free with usage limits (Google Cloud, Cloudflare, Mailgun).
Overview
In this walkthrough, I outline the whole process of setting up each and every part of this exact stack, in six steps:
- Set up Google Cloud
- Configure the domain
- Deploy Ghost
- Configure Ghost
- Finish Cloudflare configuration
- Create maintenance scripts
The whole thing takes 1-2 hours depending on your comfort level with the various technologies.
Note: To follow along with the configuration instructions below, edit the highlighted values and leave all other fields at default values.
1. Set up Google Cloud
Initialize account
- Log in to the Google account you want to use with Google Cloud, then activate Google Cloud here.
- Select
Create Project:- Project name:
ghost-blog - Location:
No organization
- Project name:
- In the floating topbar,
ActivateFree Trial. Set up a billing account. -
(Optional) In the floating topbar,
Activatea paid account. I prefer to do this immediately for two reasons. One, everything you’ve set up today will be deleted unless you remember to upgrade before the free trial ends; and two, the resources created in this walkthrough should stay within the bounds of the Always Free tier anyway. - Go to Billing > Budgets & alerts >
Create Budget:- Name:
ghost-blog-budget - Time range:
Monthly - Budget type:
Specified amount - Target amount:
2.00(in SGD) - Manage notifications:
Email alerts to billing admins and users
- Name:
Initialize Compute Engine
- Go to Compute Engine >
Enable API. If asked toCreate Credentials, enter:- Data accessing:
Application Data Yes, I'm using Compute Engine
- Data accessing:
- Go to Instance Templates >
Create Instance Template:- Name:
free-web-server - Machine family:
General-purpose - Series:
E2 - Machine type:
e2-micro (2vCPU, 1GB memory) - Boot disk:
- Operating system:
Ubuntu - Version:
Ubuntu 22.04 LTS - Boot disk type:
Standard persistent disk
- Operating system:
- Firewall:
Allow HTTP trafficAllow HTTPS traffic
- Advanced Options > Networking >
Network tags:- Type
mailthen pressEnter
- Type
- Security:
- Turn on
Secure Boot,vTPM, andIntegrity Monitoring
- Turn on
- Name:
- Go to VM instances >
Create an instance:- New VM Instance from template:
free-web-server - Name:
ghost-blog - Region:
us-west1(or any region on the Always Free Tier)
- New VM Instance from template:
- Go to Snapshots >
Create Snapshot Schedule:- Name:
weekly-backup-schedule - Schedule location:
us-west1(the same region as your instance) - Snapshot storage location:
Regional- Location:
us-west1
- Location:
- Schedule frequency:
Weekly
- Name:
- Go to Disks >
ghost-blog>Edit:- Snapshot schedule:
weekly-backup-schedule
- Snapshot schedule:
Initialize VPC Network
- Go to VPC network > Firewall >
Create Firewall Rule:- Name:
allow-outgoing-2525 - Logs:
Off - Direction:
Egress - Action on match:
Allow - Targets:
Specified target tags>mail - Destination filter:
IPv4 ranges>0.0.0.0/0 - Protocols and ports:
Specified protocols and ports>TCP:2525
- Name:
- Go to IP addresses >
Reserve External Static Address:- Name:
ghost-blog-ip - Network service tier:
Standard - Region:
us-west1(the same region as your instance) - Attached to:
ghost-blog
- Name:
- Take note of the External IP address assigned to your instance.
2. Configure the domain
Buy a domain and set up Cloudflare
- Make a Namecheap account and buy your domain. I’ll use
ghostblog.comas an example. Going forward, everywhere you seeghostblog.com, replace it with your own domain name. - Make a Cloudflare account and add your domain under the Free subscription plan.
- Under “Review your DNS records”, first delete all the records.
- Then
Add record:- Type:
A - Name:
@ - IPv4 address: your external IP address
- Proxy status:
DNS only -
Save>Continue>Confirm.
- Type:
- Go back to Namecheap > ghostblog.com > Manage > Nameservers >
Custom DNSand input the specified Cloudflare nameservers. - Go back to Cloudflare >
Done, check nameservers. - Select Overview > Advanced Actions (in the right sidebar) >
Pause Cloudflare on sitewhile finishing setup.
Set up Mailgun
- Make a Mailgun account under the
Flexplan. You’ll be asked to confirm a phone number and put your card details on file. - Select
Add a custom domain:- Domain name:
ghostblog.com - Domain region:
US(unless your website requires within-EUdata processing)
- Domain name:
- Go back to Cloudflare > ghostblog.com >
DNSand add the five DNS records Mailgun requires. Turn Proxy Status off (i.e., set all toDNS only). - Go back to Mailgun >
Verify DNS settings. - Once the custom domain has been added to Mailgun, go to Sending > Domain Settings >
SMTP Credentials. Take note of the “login” (usually[email protected]). - Click
Manage SMTP Credentials, thenReset password>Reset password>Copy. Paste this password somewhere safe—it will only be generated this once! - Click on your profile in the upper right >
API Security?Mailgun API Keys, and generate a Private API Key.
3. Deploy Ghost
Set up VM instance
-
Go back to Google Cloud > Compute Engine > VM Instances > ghost-blog >
SSH. A virtual terminal (“cloud shell”) will appear in a pop-up window. -
Update Linux:
sudo apt update && sudo apt -y upgrade -
To allow any updated services to restart, go back to Google Cloud,
StopandResumethe instance, thenSSHagain. -
Make a new user called
service_accountand grant it sudo:sudo adduser --gecos "" service_account && sudo usermod -aG sudo service_accountSet a password for
service_account. -
Switch to
service_account:su - service_account
Install Ghost dependencies
-
Install Nginx and open the firewall:
sudo apt install -y nginx && sudo ufw allow 'Nginx Full' -
Install NodeJS:
sudo apt update sudo apt install -y ca-certificates curl gnupg sudo mkdir -p /etc/apt/keyrings curl -fsSL https://deb.nodesource.com/gpgkey/nodesource-repo.gpg.key | sudo gpg --dearmor -o /etc/apt/keyrings/nodesource.gpg NODE_MAJOR=18 echo "deb [signed-by=/etc/apt/keyrings/nodesource.gpg] https://deb.nodesource.com/node_$NODE_MAJOR.x nodistro main" | sudo tee /etc/apt/sources.list.d/nodesource.list sudo apt update sudo apt install nodejs -y sudo npm install -g npm@latest -
Install MySQL:
sudo apt install -y mysql-server -
Clean up:
sudo apt clean && sudo apt autoclean && sudo apt autoremove -
Stop the
snapdprocess to save on RAM:sudo systemctl stop snapd.service -
Start MySQL in modified mode:
sudo systemctl set-environment MYSQLD_OPTS="--skip-networking --skip-grant-tables"
sudo systemctl start mysql.service
sudo mysql -u root
This will load the MySQL command line. Enter:
flush privileges;
USE mysql;
ALTER USER 'root'@'localhost' identified BY 'yourpasswordhere';
quit;
replacing
yourpasswordherewith your chosen MySQL root password. -
Restart MySQL and switch to production mode. Run:
sudo systemctl unset-environment MYSQLD_OPTS
sudo systemctl revert mysql
sudo killall -u mysql
sudo systemctl restart mysql.service
sudo mysql_secure_installation
then configure as follows:
- Install validate password component? —
N - Remove anonymous users? —
Y - Disallow root login remotely? —
N - Remove test database and its privileges? —
Y - Reload privilege tables? —
Y
- Install validate password component? —
-
Turning off MySQL’s performance schema is a common way to reduce its memory usage, which occasionally tests the limits of the free tier machine’s 1GB of RAM. To do this, open the MySQL configuration file:
sudo nano /etc/mysql/my.cnfthen add the following lines at the bottom of the file:
[mysqld]
performance_schema=0
then
Ctrl-X>Y>Enterto save and quit. -
Restart MySQL and log in:
sudo /etc/init.d/mysql restart
sudo mysql -u root -p
Then in the MySQL command line, run:
show variables like 'performance_schema';Verify that the
performance_schemavariable is indeedOFF, thenquit;
Set up Ghost
-
Install Ghost CLI:
sudo npm install ghost-cli@latest -g -
Make a new directory called
ghost, set its permissions, then navigate to it:sudo mkdir /var/www/ghost sudo chown service_account:service_account /var/www/ghost sudo chmod 775 /var/www/ghost -
Navigate to the website folder and install Ghost:
cd /var/www/ghost && ghost installthen configure as follows:
- Blog URL:
https://ghostblog.com - MySQL hostname:
localhost - MySQL username:
root - MySQL password: the password you set for
root - Ghost database name:
ghost_prod - Set up Ghost MySQL user? —
Y - Set up NGINX? —
Y - Set up SSL? —
Y, then enter your email - Set up systemd? —
Y - Start Ghost? —
Y
If you entered a value wrong, interrupt with
Ctrl + Cthen runghost setup. - Blog URL:
-
If MySQL is still giving errors, run:
sudo mysqlthen in the MySQL command line:
ALTER USER 'root'@'localhost' IDENTIFIED WITH mysql_native_password BY 'yourpasswordhere';
quit;
then run:
ghost start
Set up Mailgun on Ghost
-
While still inside
/var/www/ghost, run:sudo nano config.production.jsonand update the
"mail"section as follows, using spaces (not tabs) to indent:"mail": { "transport": "SMTP", "options": { "service": "Mailgun", "host": "smtp.mailgun.org", "port": "2525", "secure": false, "auth": { "user": "your-mailgun-username", "pass": "your-mailgun-password" } } },replacing
"your-mailgun-username"and"your-mailgun-password"with your Mailgun SMTP credentials.If you chose to set up your Mailgun in the EU, set
"host"to"smtp.eu.mailgun.org"instead. -
Restart Ghost for the config to take effect:
ghost restart
4. Configure Ghost
- Go to
https://ghostblog.com/ghost. Create your admin login credentials. - Customize your site > the “gear” icon > Email newsletter >
Mailgun settings:- Mailgun region:
US(unless you previously choseEU) - Mailgun domain:
ghostblog.com - Mailgun Private API key: paste it here.
Then click
Savein the upper-right corner. - Mailgun region:
5. Finish Cloudflare configuration
- Go back to Cloudflare. If you had previously
PausedCloudflare, go back to Advanced Actions >Enable Cloudflare on site. - Go to ghostblog.com > DNS >
Add record:- Type:
A - Name:
www - IPv4 address: your Google Cloud external IP address
- Proxy status:
Proxied
- Type:
-
Editthe other A record to change Proxy status toProxied. - Go to ghostblog.com > SSL/TLS > Overview and change SSL/TLS encryption mode to
Full.
6. Create maintenance scripts
Enable Ghost auto-start
Sometimes virtual machines restart by themselves. Create this cron job so that whenever the virtual machine restarts, Ghost does, too.
-
From the home directory of
service_account, run:crontab -eand press
1to select Nano as your text editor. -
Paste the following into the cronfile:
@reboot cd /var/www/ghost && /usr/bin/ghost start
Create update script
Create a single bash script that updates Ghost and all its dependencies.
-
Create an update script in the home directory of
service_account:cd && sudo nano update-ghost.sh -
Paste the following text into the update script:
#!/bin/bash sudo apt update && sudo apt -y upgrade sudo apt clean && sudo apt autoclean && sudo apt autoremove sudo npm install -g npm@latest cd /var/www/ghost sudo npm install -g ghost-cli@latest sudo find ./ ! -path "./versions/*" -type f -exec chmod 664 {} \; ghost backup ghost stop ghost update ghost start ghost ls -
Make it executable:
sudo chown service_account:service_account update-ghost.sh sudo chmod 775 update-ghost.sh -
Now every time you want to update Ghost in the future,
SSHto the virtual machine, thensu - service_account ./update-ghost.shNote that
ghost backuprequires your Ghost admin credentials.
Congratulations!
At this point you should have a working self-hosted Ghost blog. Updates aside, you should be working from the https://ghostblog.com/ghost control panel from now on.
Contribute
This walkthrough last worked for me in September 2023. If you spot errors, vulnerabilities, or potential improvements, please do open a pull request on this blog post!
Changelog
-
2023-12-30: Simplify creation process of
service_accountuser. -
2023-09-10: Update Nodejs installation instructions to install v18, as recommended by Ghost.
-
2023-08-10: Add cron job to auto-start Ghost upon VM restart. Thanks to Daniel Raffel for the contribution!
-
2023-08-06: Revise instructions to set MySQL root password. Thanks to Shehroz Alam on Linuxhint.
-
2023-05: Add update Ghost CLI command to
update-ghost.sh. -
2023-03: Replace SQLite with MySQL, Caddy with NGINX, and Docker with Ghost CLI. Add update script for easier maintenance.
Ghost v5.0+ introduced a breaking change: it would drop support for all databases except MySQL 8.
Consequently, the previous setup instructions broke. Months after v5.0, the unofficial Ghost Docker images were still configured for SQLite3, and I didn’t have the bandwidth to figure out how MySQL factored in to the Docker setup. When I learned that Ghost installed via the Ghost CLI could take care of SSL certificate renewals, I was more than happy to bring this walkthrough closer to the official Ghost installation instructions for Ubuntu and its recommended stack.
Later, after I got the CLI-based installation working, I considered recreating this setup using a Dockerfile. But MySQL uses much more RAM than SQLite, occasionally hitting the 1GB ceiling during relatively intensive operations, such as sending out newsletters. Adding Docker back into the mix would likely consume even more memory.
The updated version of this walkthrough draws from Ghost’s official documentation and Norbert Hunyadi’s Mailgun config snippet. Curiositry’s tutorial on hosting Ghost on Fly.io’s free tier and Cyberjunky’s Ghost v5.0 + Caddy walkthrough were also immensely helpful, though I didn’t go in those directions in the end.
-
2022-01: Initial post. This walkthrough owes a debt of gratitude to The Applied Architect’s Ghost on Google Cloud tutorial and Brian Burroughs’ Ghost + Caddy tutorial, which helped me piece together the deployment process.