Versioning comic scripts using Fountain and GitHub
I’m sold on this workflow, jump to the tutorial!
Why this workflow?
I write comic scripts in Fountain, an open-format filetype for scripts and screenplays, and export them to PDF to send to my collaborators (artists, coauthors, publishers).
Previously, each new draft would result in a sheepish email to everyone involved, asking them to please ignore the previous draft and see bullet points below for the summary of changes. This was untenable.
I wanted a workflow that enables my collaborators to:
- inspect the exact, line-by-line edits between any two drafts; and
- access the latest version of the script in PDF,
while I write and overwrite the same single file all throughout (i.e., none of this).
In short, I wanted to implement version control.
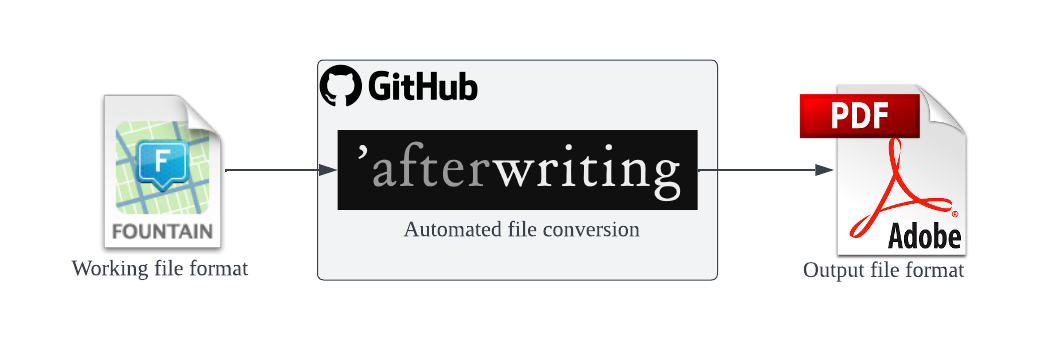
The workflow I settled on is straightforward: every time I push updated scripts to a GitHub repository, the open-source Fountain converter ’afterwriting automatically (re)generates the PDF versions of those scripts.
Requirement (1) is satisfied because Fountain files are plaintext, and thus compatible with GitHub’s compare (diff) feature. Requirement (2) is satisfied because ’afterwriting has a command line interface that can be automated with GitHub Actions.
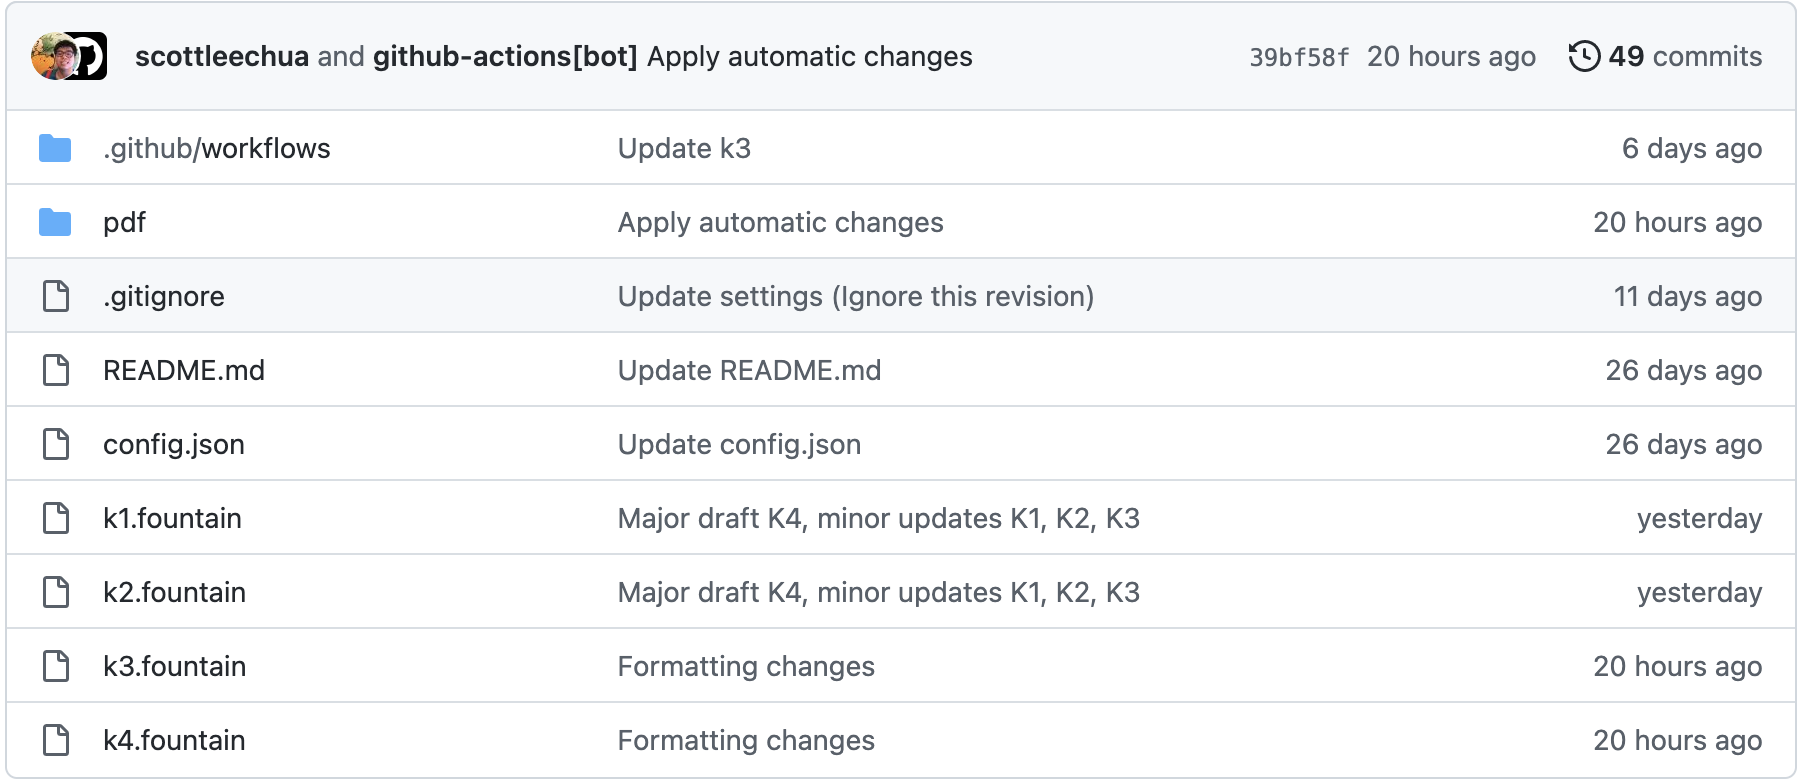
When all is said and done, the repo looks something like this:
Why use Fountain?
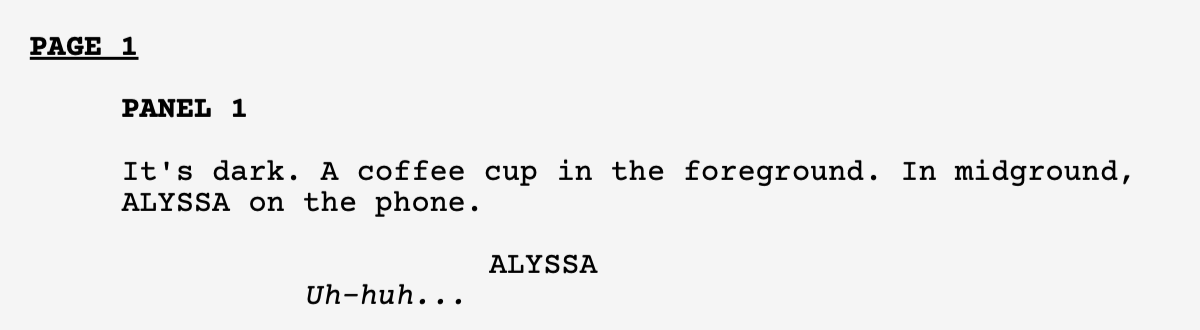
Fountain is a formatting convention for writing scriptlike documents. Here is a comic script written in Fountain:
# Page 1

.Panel 1

It's dark. A coffee cup in the foreground. In midground, ALYSSA on the phone.

ALYSSA
*Uh-huh...*
Fountain is free. Like Markdown, Fountain files are nothing more than plaintext files saved with a .fountain extension. Unlike Final Draft, Word, or Google Doc files, which require costly 1 and proprietary software to view and edit, .fountain files can be read and edited on literally any computer.2
Fountain is futureproof. Proprietary software may force strongly encourage you to upgrade to the latest version or change your file formats, but your computer will always have a text editor. This makes Fountain ideal for storing scripts without worrying about software obsolescence or incompatibilities.
Fountain exports to the usual file formats. While plaintext Fountain already looks rather “script-like,” free converter software can parse the special formatting rules3 into a nicely-rendered PDF:
(If you must, Fountain also exports nicely to Final Draft.)
Setup
- Make a GitHub account, create a new private repository, and clone it to your local computer. Let’s call this folder
my-script-repo. - Open a text editor.4 Create a text file called
.gitignoreinmy-script-repocontaining:.DS_Store desktop.ini - Move your Fountain script file into
my-script-repo. Let’s call itscript.fountain. - Create a text file called
config.jsoninmy-script-repocontaining:{ "font-family": "CourierPrime", "embolden_scene_headers": true, "show_page_numbers": true, "split_dialogue": true, "print_title_page": true, "print_profile": "a4", "double_space_between_scenes": false, "print_sections": true, "print_synopsis": true, "print_actions": true, "print_headers": true, "print_dialogues": true, "number_sections": false, "use_dual_dialogue": true, "print_notes": true, "print_header": "", "print_footer": "", "print_watermark": "", "scenes_numbers": "none", "each_scene_on_new_page": false }This config file customizes the PDF output generated by ’afterwriting. Customize these settings as you like; refer to the documentation for a complete list of available settings.
- Create a subfolder
my-script-repo/pdf. Inside it, create an empty text file called.gitkeep. - Add, commit, then push this first set of changes to GitHub. (For help, see here.) At this stage, your folder structure should look like:
. └── my-script-repo/ ├── .gitignore ├── script.fountain ├── config.json ├── pdf/ │ └── .gitkeep └── .git/ └── << ignore these files >> - Go to
my-script-repoon GitHub. Click onActions>New Workflow. - Click on Simple Workflow >
Configure. -
Rename the file from
blank.ymltofountain_to_pdf.yml. Replace the contents of the text box with:name: fountain_to_pdf on: push: branches: - main workflow_dispatch: jobs: convert_files: name: Convert Fountain to PDF runs-on: ubuntu-latest permissions: contents: write steps: - name: Check out repo uses: actions/checkout@v3 - name: Set up Bun package manager uses: oven-sh/setup-bun@v1 - name: Install 'afterwriting run: bun install afterwriting -g - name: Save PDFs of all Fountain files to '/pdf' run: | readarray -d '' filepaths< <(find . -name "*.fountain" -print0) for filepath in "${filepaths[@]}" do basename="$(basename -s .fountain $filepath)" afterwriting --source "$filepath" --pdf pdf/"$basename".pdf --overwrite --config config.json done - name: Commit changes uses: stefanzweifel/git-auto-commit-action@v4This Workflow finds all the Fountain files in your repo (including subdirectories), then saves a PDF version of each file in the
/pdffolder with the same filename. -
To the upper right of the text box, click
Commit changes>Commit changes. -
Committing changes should kickstart a run of the Actions Workflow you just created. You can track its progress on GitHub, under
Actions. - Once the Workflow is done, pull the changes to your local and verify that
/pdfnow contains the autogenerated filescript.pdf.
Setup is complete!
Use
The workflow in practice looks like this:
-
Edit your scripts on local.
-
Commit changes and push to GitHub.
-
After a minute or so,
git pull.
If you don’t want merge conflicts (and you don’t), always pull the newly-updated PDFs after every push!
Congratulations!
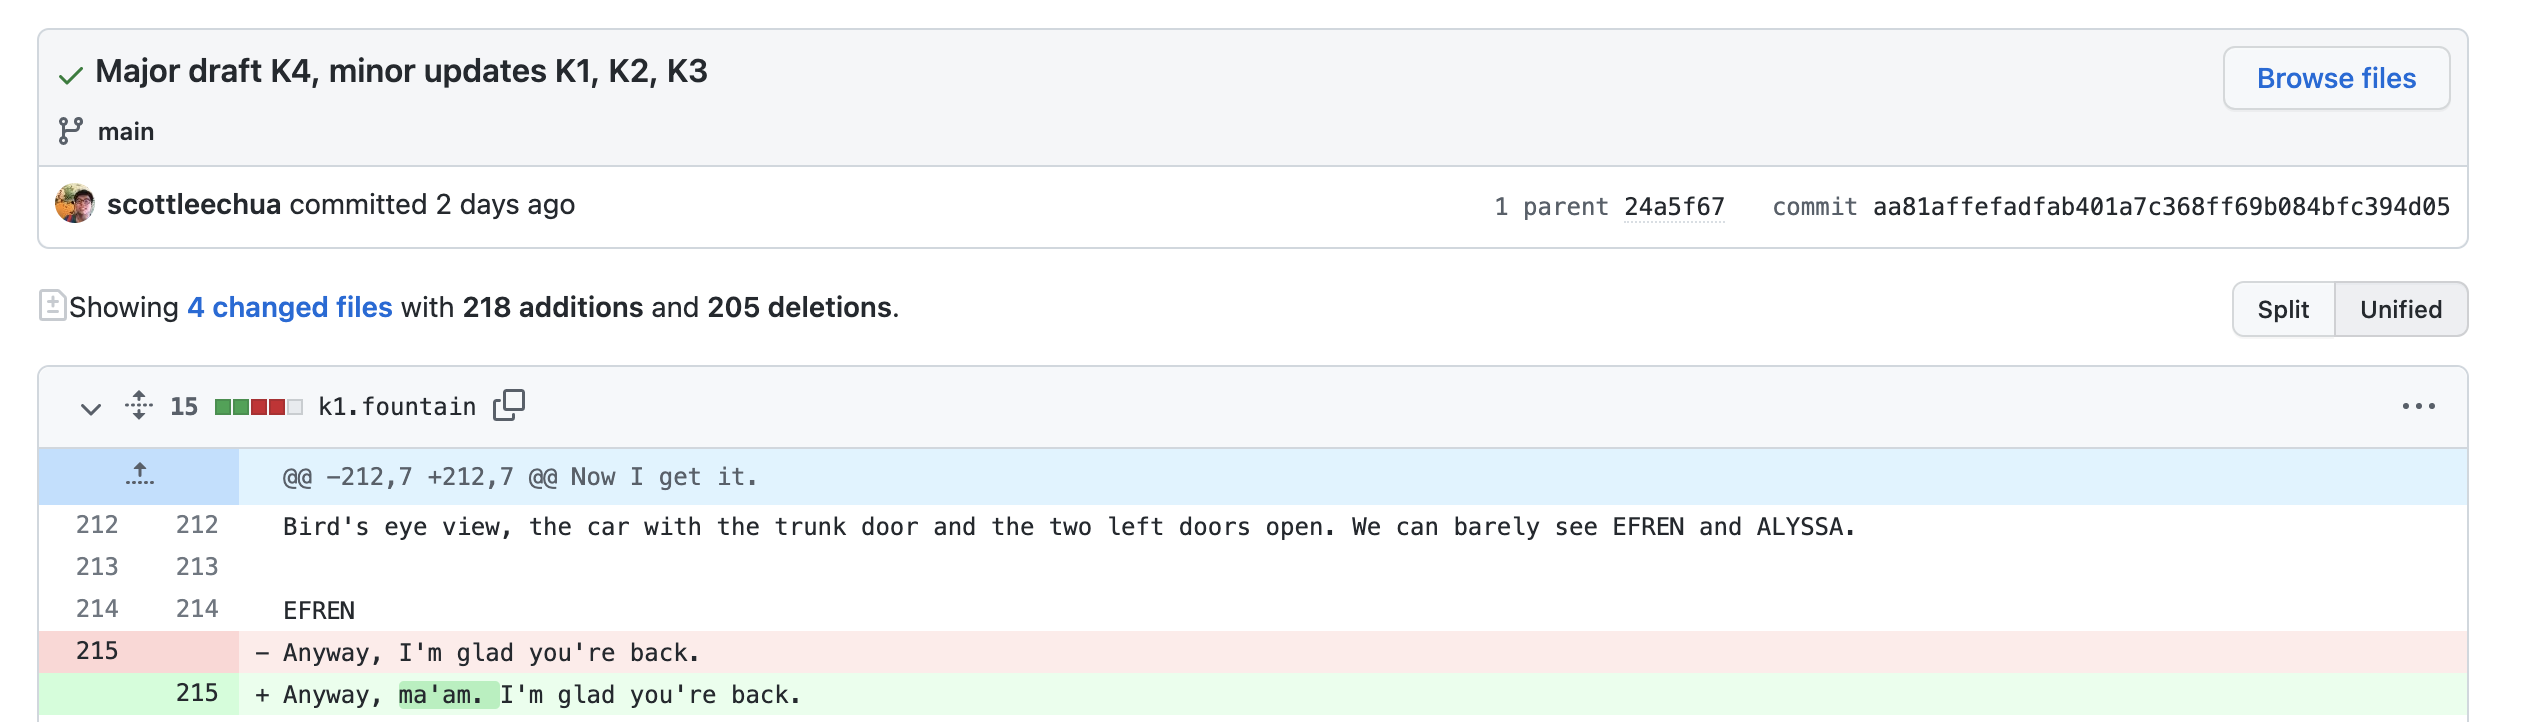
At this point, the workflow has been set up and you know how to update your scripts. Now your collaborators can see the latest edits for a given file by clicking on its latest commit:5
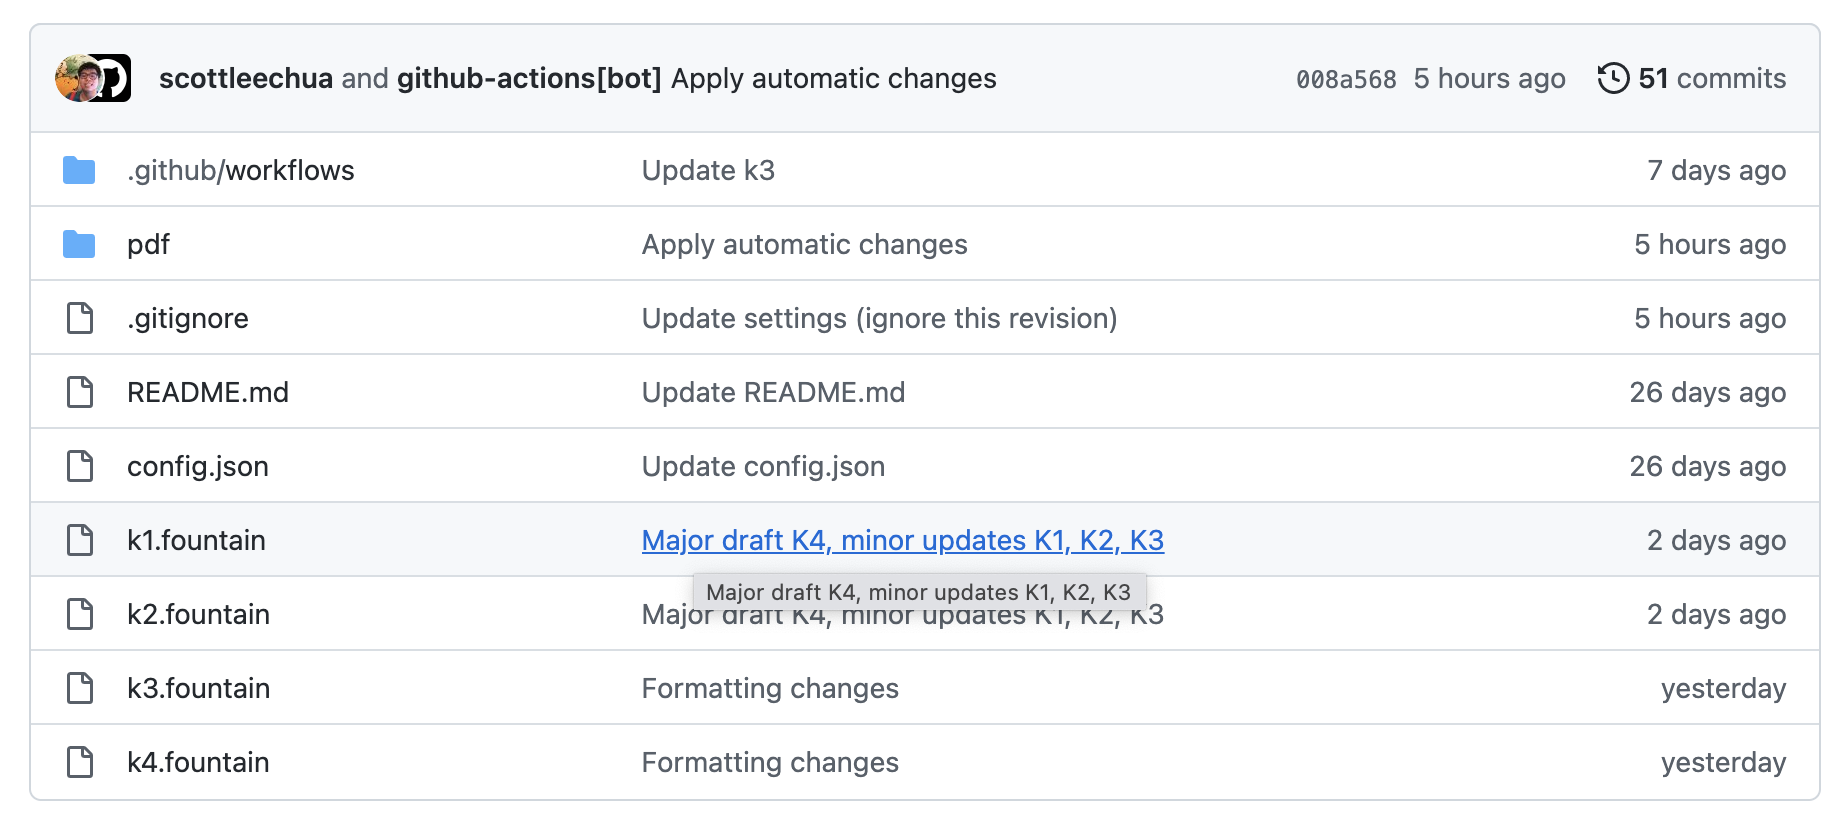
which leads them to a page with line-by-line comparisons:
Your collaborators can also view the latest PDFs by viewing the repo on GitHub, or by pulling the latest changes to their local repo.
Contribute
This walkthrough last worked for me in September 2023. If you spot errors, vulnerabilities, or potential improvements, please do open a pull request on this blog post!
Changelog
-
2023-09-12: Update
fountain_to_pdf.ymlto automatically find and convert all Fountain files in the repo. Thanks to Steven Jay Cohen for the feature request! -
2022-05-25: Initial post. This tutorial owes a deep debt of gratitude to Piotr Jamróz and the rest of the ’afterwriting team. (So do I!)
Footnotes
-
While Google Docs is technically free, a stable internet connection is not. ↩
-
Free Fountain-specific scriptwriting apps with syntax highlighting and other quality-of-life features are also available, such as Beat (Mac) or Trelby (Windows, Linux). ↩
-
For instance, section headings begin with
#; scene headings begin with.; character names are in all caps. Read the full syntax guide here. ↩ -
Every operating system has one by default, e.g., Notepad on Windows, TextEdit on Mac. ↩
-
Read the GitHub documentation for more ways to compare commits. ↩